Let's Encrypt certificates for Google Kubernetes Engine for Free
Some months ago, I was looking for a simple solution to add Let’s Encrypt to my Kubernetes clusters. I wanted to add HTTPS to my REST API for Seety. The API is hosted on Google Kubernetes Engine (GKE) and is presented via a Google load-balancer. I wanted to avoid an NGINX proxy has it would become a single point of failure (or certificates would have to be shared across replicas), and I wanted to avoid downtimes as much as possible.
After googling for several hours, the only solutions I found were using the cert-manager as sidecars and dedicated NGINX proxy which was too complicated or not convenient.
Requirements
For that project, I had some requirements:
- No Single point of failure (that I’ve to manage)
- No certificate sharing across multiple containers
- No management if possible
- As simple as possible
- A free (or cheap) solution
The solution
After discussing with a Google Cloud employee, he showed me the Google-managed certificates in the load-balancer. The solution was just in front of me since the beginning! As my searches weren’t fruitful, sharing the method can be interesting for people with the same question.
The ingress
First, you need to create an HTTP ingress for your service in Kubernetes. Here is my example:
apiVersion: extensions/v1beta1
kind: Ingress
metadata:
  name: api-ingress
spec:
  backend:
    serviceName: my-api-service
    servicePort: 4700
Apply this configuration with kubectl apply -f ingress.yml.
GKE will create the load-balancer for you and display it in the load-balancer section of the cloud console. If you don’t see the load-balancer, be patient, it can take several minutes to be available.
Add HTTPS to your Ingress
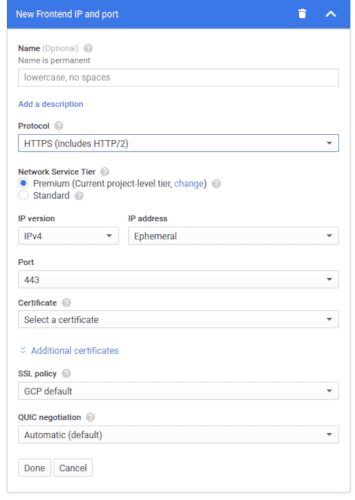
Currently, your ingress is only handling HTTP traffic. To handle HTTPS, you need to add a certificate to the load-balancer. Click your load-balancer, it’ll be named k8s-um-default-xxx. In the details of the load-balancer, hit the EDIT button (in the top bar).
Go to the Frontend configuration section and Add a Frontend. In the new section, select the HTTPS protocol. The section will be as in the following screenshot:

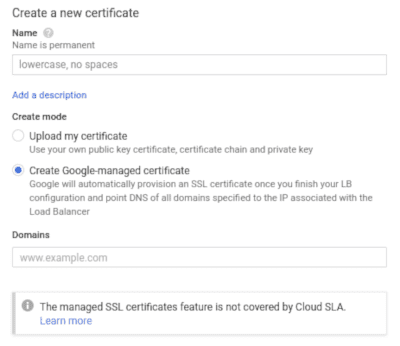
Click the Certificate dropdown and select Create a new Certificate. In the new modal, check Create Google-managed certificate.

Enter your domains in the Domains field. You can have several domain names for the same certificate but all domains will have to point to that Frontend (the same IP and port).
When you’re done, click Create, then configure the IP of your Frontend (IP address, etc.). And finally, Update the load-balancer.

Normally, the Certificate will be provisioning for some minutes (be sure that your DNS zone is already pointing to the IP). Then you’ll be ready to receive traffic in HTTPS.
Bonus: Redirect HTTP to HTTPS (The X-Forwarded-Proto Header)
During my searches, I also read in many places, that it’s impossible to redirect HTTP trafic to HTTPS with this solution. It’s not true! And the solution is pretty simple:
The load-balancer adds an HTTP header to each request. It’s then easy to detect the X-Forwarded-Proto header and redirect traffic to the HTTPS domain if headers['X-Forwarded-Proto'] === "http".
Pros and Cons
This solution is easy to implement and easy to maintain as everything is managed by Google, for you. However, it also has some downsides:
- You have to trust Google in its certificate management: As everything related to the Certificate is a black-box, you can only trust Google for its good management of the certificate.
- The traffic is in plain-text after the load-balancer: Indeed, the traffic is converted to HTTP at the load-balancer. The traffic between the load-balancer and your Pods is thus decrypted.
- No SLA: This feature isn’t covered by the Google Cloud SLA, but in my experience, I never experienced any downtimes.
I hope that this article will help you configure your HTTPS certificates with Kubernetes and Google Cloud easily. As always, don’t hesitate to give feedback! Reach me on Twitter or leave a comment.